A Step-by-Step Guide on How to Build a Raspberry Pi RetroPie Console
This single guide will walk you from a pile of parts to a fully loaded, beautifully customized raspberry pi game console, even if you’ve never touched a Raspberry Pi before. We’ll cover everything from the parts list to adding games and even fixing the most common problems. Building a Raspberry PI RetroPie Console has never been easier
You probably have a soft spot for the classics if you’re anything like me. Remember those summer afternoons spent playing ‘Centipede’ or ‘Zelda’?
But what if I told you there’s a way to relive those golden moments without spending a ton of money on a vintage console?
Well, enter the Raspberry Pi with RetroPie. RetroPie is one of numerous Operating systems a Raspberry PI can run. This tiny, magical computer gave me the ride of a lifetime, and now I’m here to guide you on replicating that nostalgic magic.
Key Takeaways
What do I need for a RetroPie setup? You need a Raspberry Pi (the Pi 4
Pi 4
is recommended), a high-quality 5V/3A power supply, a 32GB+ MicroSD card, an HDMI cable, a case (preferably one with a fan), and at least one USB or Bluetooth controller.
What is the best Raspberry Pi for RetroPie?
The Raspberry Pi 4 (with 2GB or 4GB of RAM) is the best choice. Its Raspberry Pi 4 Retropie performance is excellent for demanding systems like the N64, PlayStation 1, and PSP. A Pi 3B+ is a great budget option if you only plan to play 8-bit and 16-bit games.
What is the easiest way to install RetroPie?
he easiest and best method is to use the official “Raspberry Pi Imager” OR “Balena Etcher ” software on your computer. You can select RetroPie directly from its list of operating systems, and it will automatically flash it to your SD card.
How do I add games (ROMs) to RetroPie?
The two simplest methods are using a USB stick (which RetroPie will automatically format for you) or transferring them over your Wi-Fi network directly from your PC or Mac. We cover both in this guide.
Why is my RetroPie showing a yellow lightning bolt?
This is the most common problem! The retropie yellow lightning bolt icon is an under-voltage warning. It means your power supply is not strong enough. You must use a high-quality 5V/3A power supply, not a standard phone charger.
What’s the difference between RetroPie, Recalbox, and Lakka?
RetroPie is the most popular, powerful, and customizable option with the largest community. Recalbox is known for being simpler and more “plug-and-play,” but it is less flexible. Lakka is a very lightweight, bare-bones option. We’re using RetroPie because is building a retropie worth it? Yes, and its customizability is the main reason.
Table of Contents
Why is a Raspberry Pi Your Perfect Retro Time Machine?
So, how did my love affair with Raspberry Pi begin? Years ago I stumbled upon it online, It was created by Eben Upton as an affordable versatile machine that will change the world “This sounds cool and exactly the hobby I have been looking for.” Here’s why I became hooked on this amazing machine. There are two main reasons for this.
- Affordability: Purchasing a Raspberry Pi only required a modest investment of approximately $35 (or about $90 for the bundle). When considering the cost of a classic gaming console or a contemporary gaming device, it becomes evident why my wallet was elated with this favorable price point.
- Versatility: Beyond gaming, this little computer has helped me with various other DIY projects. It’s like the Swiss Army knife of the tech world. We will cover more of these projects in the future. For now, let’s get back to the RetroPie.
Why Choose RetroPie Over Recalbox or Lakka?
You might see other names like Recalbox, Lakka, or Batocera. So, why RetroPie?
While Recalbox is known for its simplicity and Lakka is a lightweight alternative, RetroPie is the king of customization and community. It has the largest support forum, the most themes, and the widest compatibility with emulators. By choosing RetroPie, you’re getting a platform that can grow with you, from a simple 8-bit machine to a powerhouse N64 and PSP emulator.
What Do I Need for a RetroPie Build? (Your Complete Shopping List)
Before diving into Raspberry Pi gaming with RetroPie, we need a few tools. Let’s cover these in more detail, as getting the right hardware from the start will save you a massive headache.
What’s the Best Raspberry Pi for RetroPie?
Before diving into Raspberry PI gaming with retropie, we need a few tools. Lets cover these in more detail.
- The Sweet Spot: Raspberry Pi 4 (2GB or 4GB) I recommend the Raspberry Pi 4 Model B. The
raspberry pi 4 retropie performanceis fantastic, allowing you to play more demanding 3D games from systems like the N64, PlayStation 1, and even some PSP and Dreamcast titles that the Pi 3 struggles with. The 2GB or 4GB RAM model is more than enough. - The Budget-Friendly Option: Raspberry Pi 3B+ If you’re on a budget or only care about 8-bit and 16-bit games (NES, SNES, Genesis), the 3B+ still does wonders.
- What About the Pi 5? The Pi 5 is a powerhouse, but it’s still new, and RetroPie support is in its early stages. For now, the Pi 4 is the most stable, best-supported, and cost-effective choice for this project.
Software Smarts:
- RetroPie: This is the secret ingredient It’s like an operating system designed for gaming. You can download pre-installed images or install it yourself.
Should I Buy a Bundle? (The Best Raspberry Pi Kits for RetroPie)
If you are new to all things Raspberry Pi, I highly recommend you buy a kit. It’s the “easy button” and targets the keyword best raspberry pi kit for retropie perfectly.
A good kit will save you money and ensure you have components that work. Make sure your kit includes:
A Micro-HDMI to HDMI Cable: The Pi 4 uses a micro-HDMI port, not a standard one. A kit will include this.
Let’s dive into the step-by-step process:
A Proper Power Supply (5V/3A): This is the most critical part! A cheap phone charger will not work. A bad power supply causes crashes and data corruption. It’s the #1 cause of the dreaded retropie yellow lightning bolt icon (more on that later).
A Case with Cooling: The Pi 4 needs cooling. Your kit must include a case with a small fan and/or stick-on heat sinks. This is not optional if you want good performance.
A Fast MicroSD Card (Class 10): Get at least 32GB, but I recommend 64GB or 128GB to hold your game library. Speed is crucial, so stick to a Class 10/UHS-1 card.
What Are the Best Controllers: USB or Bluetooth?
- USB Controllers: The simplest, cheapest, and most reliable option. A wired SNES-style or Xbox 360-style USB controller will work instantly with zero setup.
- Bluetooth Controllers: This gives you that clean, wireless, couch-gaming feel. The community-favorite brand is 8BitDo (their SN30 Pro is amazing). We’ll cover
how to connect bluetooth controller retropiein the setup section.
How Do I Install RetroPie? (The Easy, Modern Method)
My old method of installing an operating system and then manually installing RetroPie on top is… well, old. It’s slow and complicated. The new, modern method is so much easier.
Let’s do this the right way.
Part 1: How to install RetroPIE with Raspberry PI Imager
This is the magic. We’ll use the official tool to put the RetroPie image directly on the SD card.
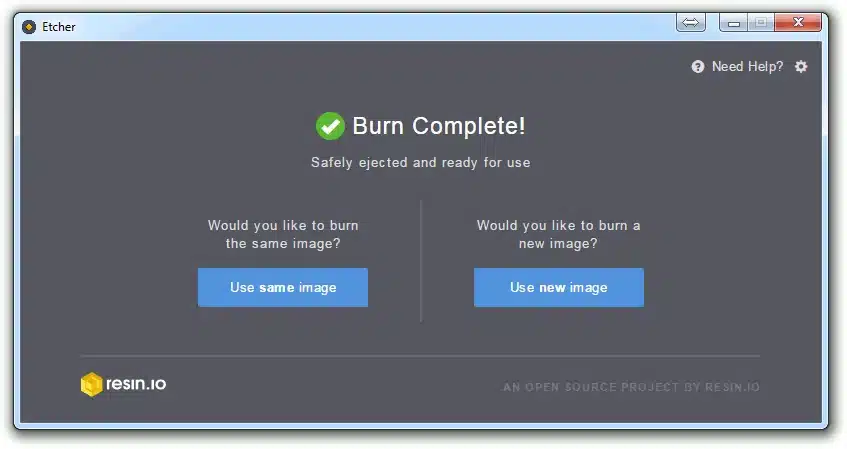
- On your main computer (PC or Mac), go to the official Raspberry Pi website and download the “Raspberry Pi Imager” tool. HINT: I personally prefer to use use Balena Etcher , it has a wider compatibility with all images for a Raspberry PI and is super fast and just as easy to use.
- Install and open the Imager.
- Insert your MicroSD card into your computer.
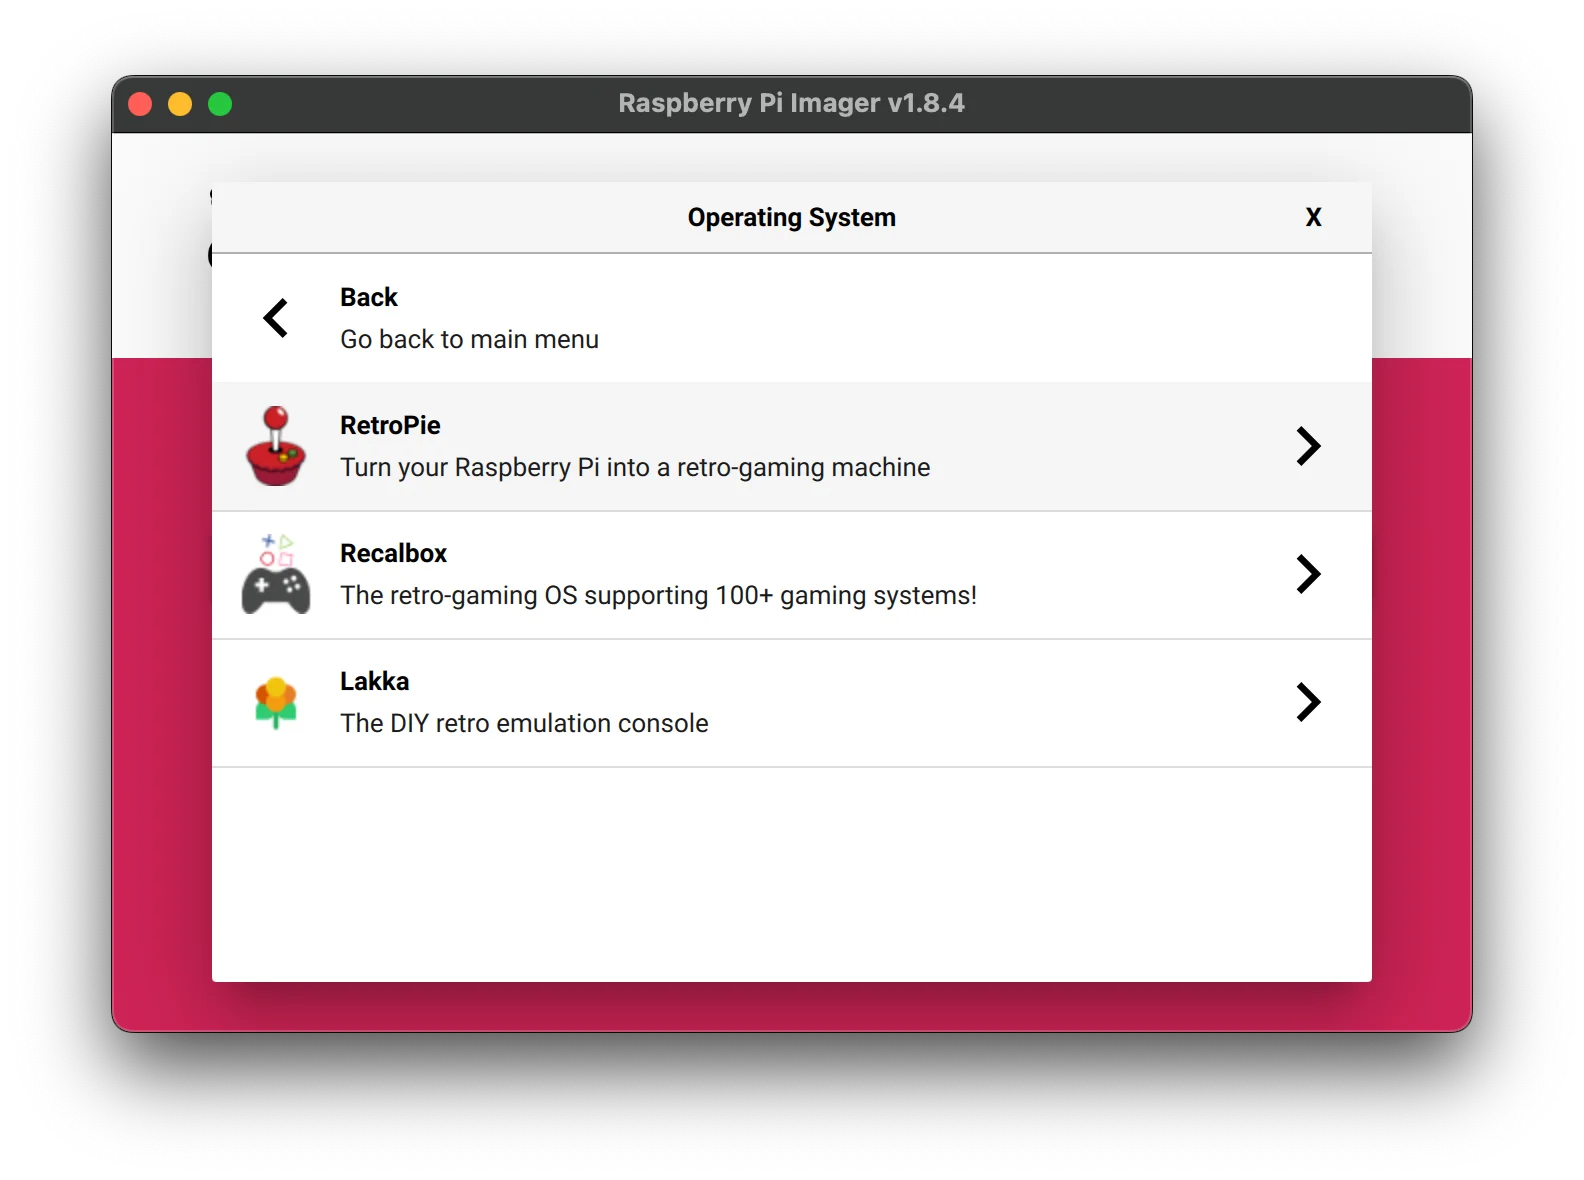
- In the Imager, click “Choose OS”.
- Navigate to “Emulation and game OS” -> “RetroPie”.
- Select the “RetroPie 4.x (RPI 4/400)” option (or the 3B+ version if you’re using that Pi).
- Click “Choose Storage” and select your MicroSD card.
- Click “Write”. Grab that coffee I mentioned—this will take 5-10 minutes.
- Once done, safely eject the SD card and insert it into your Raspberry Pi.
Part 2: First Boot and Controller Configuration
This is the moment of truth! Plug in your power cable, HDMI, and make sure your USB controller is plugged in.
- Turn on your Pi. It will boot up, resize its file system, and then restart.
- You will land on a “Welcome” screen. It will say “1 GAMEPAD DETECTED”.
- Hold down any button on your USB controller to begin.
- Now, simply follow the on-screen prompts. Press the button on your controller that matches the name on the screen (D-Pad Up, D-Pad Down, A, B, Start, Select, etc.).
- CRITICAL TIP: When you get to “HOTKEY,” I recommend mapping this to your “Select” button. This “Hotkey” is a magic button. Holding it down and pressing other buttons does special commands. The most important one? Hotkey + Start = Quit Game.
- When you’re done, select “OK.” You are now in EmulationStation!
If you make a mistake, don’t worry. This is the fix for retropie controller not configured: just press “Start” on your controller, go to the “Main Menu,” and select “Configure Input” to do it again.
My RetroPie is On! What Are the First 3 Things to Do?
You’re in! But it’s… empty. Let’s fix that. Here are the first three essential steps.
Step 1: How Do I Connect RetroPie to Wi-Fi?
This is essential for updates, scraping, and transferring games.
- From the main RetroPie menu (where you see “Configuration”), scroll down to “Configuration”.
- Select “Wi-Fi”.
- Select “Connect to Wi-Fi network”.
- Find your home network (SSID) in the list and select it.
- Type in your Wi-Fi password and press “OK.”
- It will connect and show you your IP address. You’re now online!
Step 2: How Do I “Scrape” Game Art?
Right now, your game list (once we add games) will just be a white screen with text. That’s boring. Let’s make it beautiful. This process is called “Scraping.”
Once you have games on your system (see the next section), follow these steps:
- Press the “Start” button to open the “Main Menu”.
- Go to “Scraper”.
- Under “Scrape From,” make sure “ScreenScraper” or “TheGamesDB” is selected.
- Leave the settings as-is and just select “Scrape Now”.
- This will go online and download all the beautiful box art, game descriptions, and ratings for your games. This is how you
scrape box art in retropieand it’s what makes your build look professional.
Step 3: How Do I Connect a Bluetooth Controller?
Want to cut the cord? Let’s pair that wireless controller.
- Go to “Configuration” -> “Bluetooth”.
- Select “Register and Connect New Device”.
- Put your Bluetooth controller (like an 8BitDo or PS4 controller) into pairing mode.
- The Pi will search for it. Select your controller from the list when it appears.
- It will ask you to choose a security mode. “DisplayYesNo” (or the default) is usually fine.
- Once it’s paired, it will say “Successfully registered.”
- Now, you must restart EmulationStation. Press “Start” -> “Quit” -> “Restart EmulationStation.”
- When it reboots, it will say “1 GAMEPAD DETECTED” again. Hold down a button on your Bluetooth controller to configure it, just like you did in the first boot.
How Do I Add Games (ROMs) to My RetroPie Console?
This is the big question. You have a console, but no games. Let’s fix it.
A Quick (and Legal) Word on ROMs
A “ROM” is a digital copy of a game cartridge or disc. Remember, only use ROMs of games you legally own. We do not condone piracy. The only 100% legal method is to use a special device to “dump” the ROMs from cartridges you own.
That said, a great legal way to get started is by searching for “public domain ROMs” or “homebrew NES games.” There is a thriving community of new games being made for old consoles!
Now, here’s how to transfer them.
Method 1: How to Add Games to RetroPie with a USB Stick (The Easy Way)
This is the simplest, most popular method.
- Get a USB thumb drive and format it on your PC as FAT32.
- Create a single folder on it and name it
retropie(all lowercase). - Eject the USB stick from your PC.
- Go to your Raspberry Pi (which must be on) and plug the USB stick in. Wait about 30-60 seconds. The Pi is now automatically creating its entire ROM folder structure on your USB stick.
- Unplug the USB stick from the Pi and plug it back into your PC.
- Look inside the
retropiefolder. You’ll now see a new folder:roms. - Inside
roms, you’ll see folders for every system:nes,snes,genesis,psx, etc. - Drag your game ROMs into the correct system folder. (e.g.,
MyGame.snesgoes into thesnesfolder). - Eject the stick, plug it back into the Pi, and wait. The Pi is now automatically copying the games off the USB stick and onto its SD card. This can take time if you have many games.
- THE FINAL, CRITICAL STEP: To fix the
retropie games not showing upproblem, you must restart the system’s “frontend.” On your controller, press “Start” -> “Quit” -> “Restart EmulationStation”. - Voilà! Your games will appear!
Method 2: How to Transfer ROMs to RetroPie Over Wi-Fi (The Pro Way)
This is my favorite method, and it’s even faster once you’re set up.
- Make sure your Pi is on and connected to your Wi-Fi (Step 1 above).
- On your Windows PC, open File Explorer. In the address bar at the very top, type
\\retropieand press Enter. - On a Mac, go to “Finder,” click “Go” -> “Connect to Server,” and type
smb://retropie. - Just like magic, you will see a list of folders from your Pi. Open the “roms” folder.
- Now, just drag and drop your ROM files from your PC directly into the correct system folders over your network.
- Once you’re done, remember the final step: Restart EmulationStation on your Pi (“Start” -> “Quit” -> “Restart EmulationStation”) for the new games to show up.

Help! How Do I Fix Common RetroPie Problems?
You’re going to run into a snag. Everyone does. Here are the fixes to the top 3 problems.
What is the Yellow Lightning Bolt Icon?
- The Problem: You see a small, yellow lightning bolt (
retropie yellow lightning bolt icon) in the top-right corner of your screen, and your games might be laggy. - The Fix: This is the #1 problem for beginners. It means your Raspberry Pi is under-powered. Your power supply is not good enough. A cheap phone charger will not work. You must use a high-quality, 5V/3A power supply designed for the Raspberry Pi 4. Buying a good one will make this problem disappear forever.
How Do I Fix the Black Border on My Screen?
- The Problem: There’s a big, ugly black border around your game, and it’s not using your whole TV screen.
- The Fix: This is an easy fix for the
retropie black border fixkeyword! This is an old setting called “overscan.” We just need to turn it off.- From the RetroPie main menu, go to “Configuration”.
- Select “Raspi-Config”.
- Go to “Display Options” -> “Underscan”.
- It will ask, “Would you like to enable overscan compensation?” Select “No”.
- Exit Raspi-Config and reboot your Pi. The black border will be gone!
Why Aren’t My Games Showing Up or My Controller Stopped Working?
- The Problem: You added games, but the list is empty. Or, you plugged in a new controller, and it’s not working.
- The Fix (99% of the time):
- For Games: You forgot to restart! Press “Start” -> “Quit” -> “Restart EmulationStation”.
- For Controllers: You need to tell RetroPie about it. Press “Start” (with a working controller) -> “Configure Input” and re-run the setup process for your new controller.
How Can I “Level Up” and Customize My RetroPie Build?
Got the basics down? Now for the really fun part.
How Do I Customize RetroPie Themes?
This is the best way to make the console yours.
- Go to “Configuration” -> “ES Themes”.
- This will open a gallery. You can download and install hundreds of themes created by the community.
- I recommend trying “Pixel” for a clean, retro feel, “Carbon” for the classic look, or “EpicNoir” for a dark, modern interface.
- After installing a theme, go back to the “Main Menu” (“Start”) -> “UI Settings” -> “Theme Set” and select your new theme. It will change instantly!
What About Overclocking? (Advanced Users Only)
One of the key advantages I love about Raspberry PIs is you can safely overclock them, but a word of caution: Do not attempt this unless you have a good case with a fan and heat sinks. Overclocking is like giving your Pi some caffeine, but it will heat up.
- Go to “Configuration” -> “Raspi-Config”.
- Navigate to “Performance Options” -> “Overclock”.
- Choose a moderate setting, like “Moderate” or “1800MHz”. Don’t jump straight to “Turbo.”
- Reboot and test. If your system is stable, you’ll get a nice performance boost in those tough-to-run N64 games.
Conclusion – What Are You Waiting For? Game On! How to Build A Raspberry PI RetroPie Console
And there you have it! Your very own retro gaming time machine, ready to transport you back to your cherished childhood gaming days.
My journey with Raspberry Pi with RetroPie has been a mix of delightful discovery, occasional hair-pulling, and tons of exhilarating gameplay. It’s the perfect project: affordable, fun, and endlessly customizable.
Now, it’s your turn. Dive in and game on!