Introduction to Building your own PC
Is it cheaper to build a PC? How much does it cost to build a PC? Making your own computer can be a rewarding and cost-effective experience. In this article, we’ll weigh the pros and cons of building your own computer versus buying one and provide step-by-step instructions for making your computer.
On the Plus Side – You Are In Control When You Build a PC
One of the most significant advantages of building your computer is cost. Therefore It can be cheaper to build a PC. When you buy a pre-built computer, you’re paying for many components you may not need or want. Also, many of these pre-built machines are difficult or even impossible to upgrade later. By making your computer, you can choose exactly which components you want and often save money in the process. You can also choose to upgrade specific parts of your computer when they become outdated rather than having to replace the entire system. I have been a lifelong fan or modding and building computing devices.
The second advantage of building your computer is customization. When you make your computer, you have complete control over the components and can tailor the system to your specific needs. For example, if you’re a gamer, you can build a system with a powerful graphics card and fast processor. On the other hand, if you’re a video editor, you can create a system with a large amount of storage and fast RAM. You also have a wide choice of really swish-looking cases to choose from.
Are there downsides – When you build your PC
However, building your computer also has its downsides. One of the most significant downsides is the time and effort required. Building a computer from scratch can be time-consuming and require specific technical knowledge. Therefore, there may be better choices than making your computer if you’re uncomfortable working with computer components or need more time to invest in the process. It Can also be an expensive endeavor. However, in many opinions, your money is better spent this way.
Another downside is the potential for errors. If you need to familiarize yourself with the components and how they work together. You can make mistakes that can cause your system to malfunction. This can be costly, as you may need to purchase new or replacement components or pay for repairs.
Don’t Skimp This critical part of the process of Building a PC
Before you purchase your equipment and start the process, there is a lot of research that would greatly benefit you. You could use a computer builder website to help, and one great example would be.
https://pcpartpicker.com/
Below is an example of how easy it can be to pick components of your new PC Build. These can also aid you in deciding whether it is cheaper to build a PC. Pricing does often change for parts that contain many semiconductors. These sites can also offer alternate options, lowering your overall system costs. You will see upfront what how your choices impact your wallet.
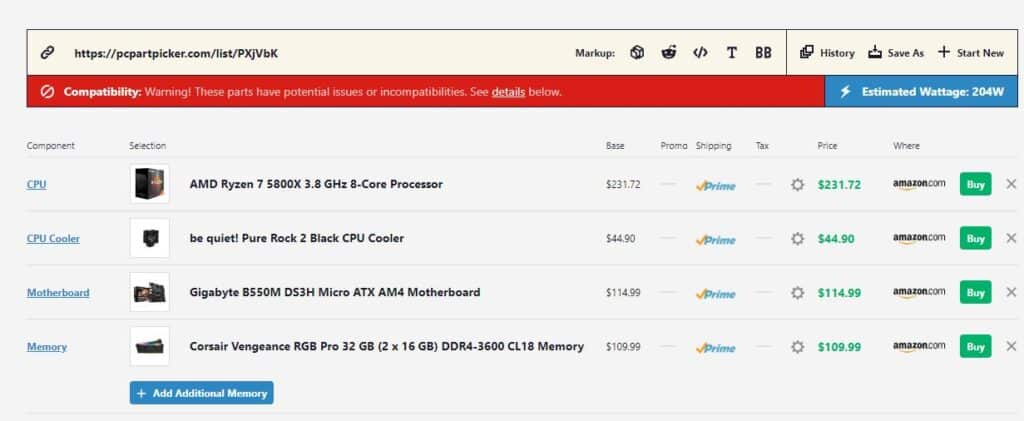
Using such sites can help you avoid some of the compatibility issues you could face during your process. In addition, this can save you lots of money by avoiding costly mistakes.
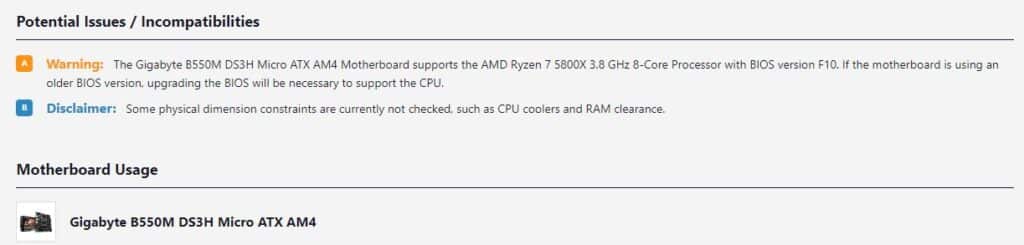
Websites such as these can be invaluable. When you start the process of selecting your components, it can warn you about compatibility issues. It also can tally up the power consumption to aid in sizing your PSU or power supply unit. Lastly, it can benefit your shopping process and guide you toward vendors that have great pricing.
Now, we’ve discussed some pros and cons of building your own computer and some critical tips. But first, is it cheaper to build a PC? Next, to help answer that for you, let’s dive deeper into the step-by-step instructions for making one. I call this the exciting phase.
Step 1: Build a PC – Gather Your Components
The first step in building your own computer is gathering all the necessary components. This process includes the motherboard, processor, RAM, power supply, storage, and case. It’s essential to ensure that all parts are compatible with each other before you begin. Reading through your motherboard manual and being familiar with its BIOS upgrade process will be advantageous.
Step 2: Install the CPU
The next step is to install the Central Processing Unit (CPU) into the motherboard. Carefully follow the instructions provided with your motherboard, as the process may vary depending on the model. Ensure the CPU is seated correctly and the heat sink and fan are securely attached. Most CPU’s come with their own Cooler fan. By selecting these, you will save even more money.
Step 3: Install the RAM
Next, install the Random Access Memory (RAM) into the appropriate slots on the motherboard. Ensure that the RAM is seated correctly and the tabs are locked in place. Most Users will be fine with 16 GB or 32 GB (if you do more intensive work, or hardcore gaming) Memory kits are often sold in packs to keep your price down.
Step 4: Install the motherboard
Now it’s time to install the motherboard into the case. Carefully align the motherboard with the standoffs in the case and screw it in place. Now you can see the machine taking shape.
Step 5: Install the power supply
The next step is to install the power supply into the case. Ensure the power supply is securely attached. Your case may have a cable management system to hide the cables and increase airflow around the inside of the case. The power supply is usually the last component you select for purchase, as you will need some idea of the power consumption from all your other parts first. This helps prevent you from being stuck with an under or overpowered PSU.
Step 6: Install the storage
Now it’s time to install the storage, such as a solid-state drive, or the more commonly used M.2 Drives. These offer a significant performance boost. They are also getting cheaper and larger all the time. First, ensure the storage is seated correctly, and the cables are properly connected.
Step 7: Connect the peripherals
The final step is to connect the peripherals, such as the keyboard, mouse, and monitor. Make sure that all of the cables are correctly connected and that the system is adequately powered on.
Step 8: Essential Updates
Update all the firmware and be prepared to install your operating system. Some motherboards may require their BIOS to be updated before you can install Windows. Take a few moments to download all the firmware and drivers you need before installing the OS.
Is It Cheaper to build a PC – Conclusion
In conclusion, how much does it cost to build a PC? Well, it can be a cost-effective and rewarding experience. We have shown you tools that can help estimate costs. But in addition, it requires a certain level of technical knowledge and time investment. On the other hand, buying a pre-built computer is more convenient, but it’s less customizable and often more expensive in the long term. Therefore, it’s essential to consider your needs and skill level before deciding.